# Polygon
The polygon tool is most annotators preferred tool of choice for instance segmentation. It allows you to create more complex shapes than bounding boxes, that can “fit” the shape of whatever you want to annotate.
The polygon tool can be selected by pressing “P”.
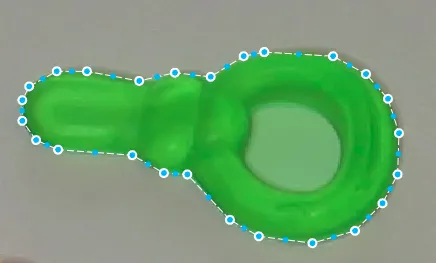
The polygon tool being used to annotate a car
You can speed up the creation of polygons by activating the class predictor.
#### Creating a polygon
After having selected the tool, you can start to create a polygon by left-clicking anywhere in the image (or press “a” with the mouse pointer located where you want to place the first vertex). After the first vertex (one of the points that make out a polygon) has been created, you can move your mouse around as you see fit. When you find the next location on which you want to place a vertex, you left-click or press “A” again. You continue like this until you are satisfied with the shape of your polygon.
If you are unhappy with the placement of your last vertex, you can delete it by pressing “del”, “backspace”, or “D”. To erase all vertices and start over, you can press “esc”.
There are various ways to finish a polygon. You can “close the loop” by left-clicking on the first vertex. You can also press “enter”, or do a left mouse-button double-click to complete the polygon without having to find the first vertex.
To unlock AI assistance, don't forget to set image status to "done" or "to review" after you've finished annotating an image. By doing so, you will train AI assistants that will reduce time per annotation considerably.
#### Editing a polygon
To edit a polygon, first, you need to select the move/edit tool. When that is done, you can left-click on any polygon that you want to edit. With this done, you should see all existing vertices that make up the polygon as well as smaller blue dots.
You can move an existing vertex moving your mouse pointer over it, and then left-click and drag it to the desired position. You can also click on a vertex and then when it is selected move it with the arrow keys. For smaller movements, you can press “alt” when using the arrow keys. For larger movements, you can press “shift”.
To select and move many vertices, you can either press “shift” and then click on all vertices you want to select, or left-click, hold, and drag an area in which you want to select all vertices. When you have multiple vertices selected, you can move them in the same way you would move a single vertex.
You can also delete one or more vertices when they are selected by pressing “del”, “backspace”, or “D”.
If you want to add new vertices, you can do so by clicking the smaller blue dots. These are potential vertices. You will notice that when you click one, two more will appear to the left and the right of the one you clicked.
#### Delete polygons
**See delete objects**
---
# Agent Instructions: Querying This Documentation
If you need additional information that is not directly available in this page, you can query the documentation dynamically by asking a question.
Perform an HTTP GET request on the current page URL with the `ask` query parameter:
```
GET https://docs.cloudfactory.com/annotation-environment/introduction-to-the-annotation-environment/manual-and-semi-automated-tools/polygon.md?ask=
```
The question should be specific, self-contained, and written in natural language.
The response will contain a direct answer to the question and relevant excerpts and sources from the documentation.
Use this mechanism when the answer is not explicitly present in the current page, you need clarification or additional context, or you want to retrieve related documentation sections.